
Introduction
Nowadays, the knowledge to install a mail server is an important task for any System Administrator. In our case, we are going to see how to deploy a mail server with Postfix on Ubuntu.
About Postfix
Postfix is a free and open-source MTA (Mail Transfer Agent) which routes and delivers electronic mail (e-mails). As an SMTP server, Postfix implements a first layer of defense against spambots and malware. Can be used to send and receive e-mail. This is the default MTA software on all Linux distributions.
Prerequisites
In order to follow this guide, you should have:
- Root access to your Ubuntu Server.
- A FQDN pointed at your Ubuntu Server.
Postfix installation
The first step is the installation of Postfix. It’s quite easy because the software is in Ubuntu’s default package repositories.
Since this is our first operation with apt in this session, we’re going to update our local package index and then install the Postfix package.
sudo apt update
sudo apt install postfix
During the installation process you will be prompted some configuration information, such as the System mail name, which should be the domain (in our case ophelia.ga). Once installed, you should check the file /etc/mailname which contains the correct domain.
root|ophelia:~$ cat /etc/mailname
ophelia.ga
It is also important to check whether the domain is configured in the file /etc/hosts. In my case it is well configured in the line with the loopback IP 127.0.1.1.
root|ophelia:~$ cat /etc/hosts
# Your system has configured 'manage_etc_hosts' as True.
# As a result, if you wish for changes to this file to persist
# then you will need to either
# a.) make changes to the master file in /etc/cloud/templates/hosts.debian.tmpl
# b.) change or remove the value of 'manage_etc_hosts' in
#     /etc/cloud/cloud.cfg or cloud-config from user-data
#
127.0.1.1 ophelia.ga ophelia
127.0.0.1 localhost

# The following lines are desirable for IPv6 capable hosts
::1 localhost ip6-localhost ip6-loopback
ff02::1 ip6-allnodes
ff02::2 ip6-allrouters
DNS Configuration
One important thing is to have the basic DNS configuration done. If your domain is “ophelia.ga”, then this domain should be configured to point the A (or AAAA if IPv6) DNS records to your mail server. This configuration normally is done in your hosting provider web administration (In my case, DigitalOcean).
To check this configuration you could run this command from the mail server, or better, another Linux machine.
yvoictra|lavrea:~$ dig A +noall +answer +multiline ophelia.ga
ophelia.ga.             3600 IN A 159.223.173.62
The IP address answered should be the one where you have your mail server.
User creation
Once Postfix is installed, we can create a new user in order to use it to send & receive mails. This is not mandatory, but recommended.
root|ophelia:~$ sudo adduser gabriel
Include the user to mail group
It is recommended to include users which should access e-mail to the group “mail”.
usermod -aG mail gabriel
Opening Postfix Ports
Normally, the Operating System has the mail port closed. In the case of Ubuntu, you should allow Postfix in the rules:
root|ophelia:~$ sudo ufw allow Postfix
Rule added
Rule added (v6)
Now, the rules should include Postfix (Port 25 TCP) in the configuration of allowed ports:
root|ophelia:~$ sudo ufw status verbose
Status: active
Logging: on (low)
Default: deny (incoming), allow (outgoing), disabled (routed)
New profiles: skip

To                         Action      From
--                         ------      ----
25/tcp (Postfix)           ALLOW IN    Anywhere
22/tcp (OpenSSH)           ALLOW IN    Anywhere
25/tcp (Postfix (v6))      ALLOW IN    Anywhere (v6)
22/tcp (OpenSSH (v6))      ALLOW IN    Anywhere (v6)
Testing the Port 25 TCP from the Internet
Now I like to check from any other machine on the Internet the port is open, and I can access without any issue. As you maybe know from previous posts, I use Netcat to check the connectivity.
For this test, I only need the Public IP address of the mail server.
yvoictra|lavrea:~$ nc -w 1 -vz 159.223.173.62 25
Connection to 159.223.173.62 25 port [tcp/smtp] succeeded!
In this case, the connection is working fine.
Testing mail service with mail tool
Local delivery
In order to check the correct delivery of mail, we can use the tool mailutils. It is not installed by default, so this is the first step:
sudo apt install mailutils
The first test is to send an e-mail from the local user “root”, to the new local user “gabriel”. In that case, it should be done like this (from root account):
root|ophelia:~$ mail gabriel@ophelia.ga
Cc:
Subject: Test
Test
root|ophelia:~$
(Control+D to finish)
The /var/log/mail.log log should have this info related to this mail:
Jul 26 09:17:28 ophelia postfix/pickup[10541]: DF5EA3F32F: uid=0 from=<root@ophelia.ga>
Jul 26 09:17:28 ophelia postfix/cleanup[11358]: DF5EA3F32F: message-id=<20220726071728.DF5EA3F32F@ophelia.ga>
Jul 26 09:17:28 ophelia postfix/qmgr[10542]: DF5EA3F32F: from=<root@ophelia.ga>, size=315, nrcpt=1 (queue active)
Jul 26 09:17:28 ophelia postfix/local[11361]: DF5EA3F32F: to=<gabriel@ophelia.ga>, relay=local, delay=0.06, delays=0.04/0.01/0/0.01, dsn=2.0.0, status=sent (delivered to mailbox)
Jul 26 09:17:28 ophelia postfix/qmgr[10542]: DF5EA3F32F: removed
Then, we can connect to the gabriel user account, to check the delivery of the mail, with the command mail:
root|ophelia:~$ su - gabriel
gabriel@ophelia:~$ mail
"/var/mail/gabriel": 1 mensaje 1 nuevo
>N   1 root               lun jul 26 09:17  14/411   test
?
Remote delivery
Now we can test the delivery of an e-mail to a remote e-mail server. In that case, we will use the local user “gabriel” to send an e-mail to the GMail server.
root|ophelia:~$ su - gabriel
gabriel@ophelia:~$ mail mytestaccount@gmail.com
Cc:
Subject: Test
Test
(Control+D to finish)
In this situation, the mail could not arrive to the destination (it’s normal, we haven’t finished!)
You could have a clue of what’s happening in the log /var/log/mail.log:
Jul 26 09:20:45 ophelia postfix/pickup[10541]: 2AA2C3F330: uid=1000 from=<gabriel@ophelia.ga>
Jul 26 09:20:45 ophelia postfix/cleanup[11514]: 2AA2C3F330: message-id=<20220726072045.2AA2C3F330@ophelia.ga>
Jul 26 09:20:45 ophelia postfix/qmgr[10542]: 2AA2C3F330: from=<gabriel@ophelia.ga>, size=315, nrcpt=1 (queue active)
Jul 26 09:20:46 ophelia postfix/smtp[11516]: 2AA2C3F330: to=<mytestaccount@gmail.com>, relay=gmail-smtp-in.l.google.com[172.253.115.26]:25, delay=1.2, delays=0.02/0.01/0.48/0.65, dsn=5.7.1, status=bounced (host gmail-smtp-in.l.google.com[172.253.115.26] said: 550-5.7.1 [159.223.173.62      12] Our system has detected that this message is 550-5.7.1 likely unsolicited mail. To reduce the amount of SPAM sent to Gmail, 550-5.7.1 this message has been blocked. Please visit 550-5.7.1  https://support.google.com/mail/?p=UnsolicitedMessageError 550 5.7.1  for more information. o10-20020a05620a2a0a00b006aee4afb966si10902320qkp.524 - gsmtp (in reply to end of DATA command))
Jul 26 09:20:46 ophelia postfix/cleanup[11514]: 516913F334: message-id=<20220726072046.516913F334@ophelia.ga>
Jul 26 09:20:46 ophelia postfix/qmgr[10542]: 516913F334: from=<>, size=3019, nrcpt=1 (queue active)
Jul 26 09:20:46 ophelia postfix/bounce[11517]: 2AA2C3F330: sender non-delivery notification: 516913F334
Jul 26 09:20:46 ophelia postfix/qmgr[10542]: 2AA2C3F330: removed
Jul 26 09:20:46 ophelia postfix/local[11519]: 516913F334: to=<gabriel@ophelia.ga>, relay=local, delay=0.02, delays=0/0.01/0/0, dsn=2.0.0, status=sent (delivered to mailbox)
Jul 26 09:20:46 ophelia postfix/qmgr[10542]: 516913F334: removed
In my case, the GMail server set the mail status as bounced, with the error 550-5.7.1. GMail has a website to explain each error their SMTP server has. Don’t worry, it’something normal to get an error in this first steps.
Regarding my error, this is the info from GMail:
550, “5.7.1”, Our system has detected an unusual rate of unsolicited mail originating from your IP address. To protect our users from SPAM, mail sent from your IP address has been blocked. Review Prevent mail to Gmail users from being blocked or sent to SPAM.
In the next section, I will explain measures to avoid this blocked.
Configure the mail server to avoid being blocked
Regarding e-mail service, it’s quite normal for a server or domain to be flagged as a spammer. I guess by default, you are a spammer until proven otherwise. By excluding the possibility of a compromised server, a false flag is usually caused by one of the following:
- The server is an open mail relay
- The sender’s server’s IP address is blacklisted
- The server does not have a FQDN and a PTR record
- The Sender Policy Framework (SPF) DNS record is missing, or it is misconfigured
- The DomainKeys Identified Mail (DKIM) implementation is missing, or it’s not properly set up
Here, I will explain the best practices to avoid being blocked by other mail servers.
Additional DNS entries (MX and PTR records)
Previously we have checked / added the A (or AAAA) DNS entries to our mail server, but it is needed another type of entries to have the mail server right.
The entries we need now are the MX and PTR DNS records.
MX DNS entries
This configuration is quite simple. You just need to add the MX record (usually from the administration web of your hosting provider. In my case, DigitalOcean), and it is needed to add the variable “priority” and “TTL”. I will leave these variables by default (No priority = 0 ; TTL=14440 seconds).
Once done, you could test the configuration with dig.
[23:03:43] root|lavrea:~$ dig MX +noall +answer +multiline ophelia.ga
ophelia.ga.             14400 IN MX 0 ophelia.ga.
PTR DNS entries
PTR DNS records are used to solve a reverse DNS lookup or reverse DNS resolution (rDNS). This is the method to determine the domain name associated with an IP address.
So, first I have to know the A record (IP Address) of the server:
yvoictra|lavrea:~$ dig A +noall +answer +multiline ophelia.ga
ophelia.ga.             3600 IN A 159.223.173.62
And now I have to request the PTR record with the dig command using the parameter -x, in my case:
root|lavrea:~$ dig +noall +answer +multiline -x 159.223.173.62
62.173.223.159.in-addr.arpa. 1800 IN PTR ophelia.ga.
Another way (It’s more complex because you have to reverse the IP address, and add the suffix “.in-addr.arpa.”) is:
root|lavrea:~$ dig PTR 62.173.223.159.in-addr.arpa. +noall +answer
62.173.223.159.in-addr.arpa. 1438 IN    PTR     ophelia.ga.
So yes! Both tests resolve the domain of my mail server (ophelia.ga), which means my hosting provider added the PTR record when I run the server.
Authentication Protocols (DKIM, SPF and DMARC)
These are the authentication mechanism have been created in the last years to avoid SPAM.
SPF (Sender Policy Framework)
SPF (Sender Policy Framework) is a system that identifies to mail servers what hosts are allowed to send email for a given domain. Setting up SPF helps to prevent your email from being classified as SPAM.
The SPF uses a new DNS record with the TXT type of entries. If you need more information about this, visit the SPF record syntax page. In my experience, I usually use the same configuration which works well in most of my configurations.
v=spf1 a -all
I will explain the syntax of this record:
- The
v=spf1tag, which is mandatory in these records. - The
atag is used to indicate the “A record” of the domain, is allowed to send mail (it’s the same as using+a). - The
-alltag is used with the qualifier-to indicate to prohibit all others DNS entries (different from the ‘A’ record).
Other options could be:
v=spf1 mx -all
In that case, instead of the ‘A’ record, it specifies the MX record of the domain is the only one allowed to send mail. In my case, this option also works, because I also have MX DNS records in my domain.
v=spf1 ip4:159.223.173.62 -all
In this last example, I have added the IPv4 IP address of my mail server.
Finally, this configuration has to be done in the DNS server. In my case, I will use my hosting provider, DigitalOcean, to do it.
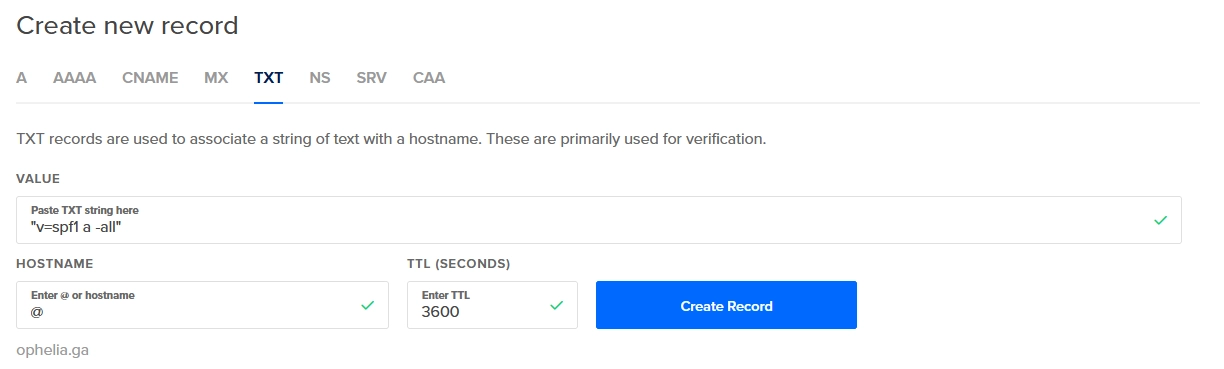
Once done, you can check the TXT records with dig from any Linux server with Internet connection.
root|lavrea:~$ dig TXT ophelia.ga +noall +answer
ophelia.ga.             3600    IN      TXT     "v=spf1 a -all"
And yeah! SPF record is done.
DKIM (DomainKeys Identified Mail)
DKIM (DomainKeys Identified Mail) is a system that lets your mail servers add a signature to headers of outgoing email. It identifies your domain’s public key so other mail servers can verify the signature. This signature helps keep your mail from being considered as SPAM.
Install DKIM
The First step with DKIM, is to install a pair of packages.
sudo apt install opendkim opendkim-tools
DKIM config files
Once installed, it is needed to edit several config files.
We will start with the opendkim.conf config file:
sudo vi /etc/opendkim.conf
And add this config at the end of the file.
AutoRestart             Yes
AutoRestartRate         10/1h
UMask                   002
Syslog                  yes
SyslogSuccess           Yes
LogWhy                  Yes

Canonicalization        relaxed/simple

ExternalIgnoreList      refile:/etc/opendkim/TrustedHosts
InternalHosts           refile:/etc/opendkim/TrustedHosts
KeyTable                refile:/etc/opendkim/KeyTable
SigningTable            refile:/etc/opendkim/SigningTable

Mode                    sv
PidFile                 /var/run/opendkim/opendkim.pid
SignatureAlgorithm      rsa-sha256

UserID                  opendkim:opendkim

Socket                  inet:12301@localhost
The next config file is the /etc/default/opendkim:
sudo vi /etc/default/opendkim
And add the next line at the end of the file.
SOCKET="inet:12301@localhost"
The last config file to modify is the one of Postfix, which will allow adding the DKIM headers.
sudo vi /etc/postfix/main.cf
It is needed to add these lines.
milter_protocol = 2
milter_default_action = accept
smtpd_milters = inet:localhost:12301
non_smtpd_milters = inet:localhost:12301
The next step is to create the directory structure:
sudo mkdir -p /etc/opendkim/keys
And create a new file TrustedHosts
sudo vi /etc/opendkim/TrustedHosts
In which you should add the domain of your mail server.
127.0.0.1
localhost
*.ophelia.ga
Next file is the KeyTable, and the same, add a line of the domain.
sudo vi /etc/opendkim/KeyTable
And add next line (change the mail server domain!)
mail._domainkey.ophelia.ga ophelia.ga:mail:/etc/opendkim/keys/ophelia.ga/mail.private
And the last file to be added, SigningTable.
sudo vi /etc/opendkim/SigningTable
Add a line with these format (change the mail server domain!)
*@ophelia.ga mail._domainkey.ophelia.ga
Create DKIM key
And the last step is to create the DKIM key.
Create the directory for the domain:
sudo mkdir /etc/opendkim/keys/ophelia.ga
cd /etc/opendkim/keys/ophelia.ga
And create the DKIM key:
sudo opendkim-genkey -s mail -d ophelia.ga
Also, it is needed to change the owner of the file.
sudo chown opendkim:opendkim mail.private
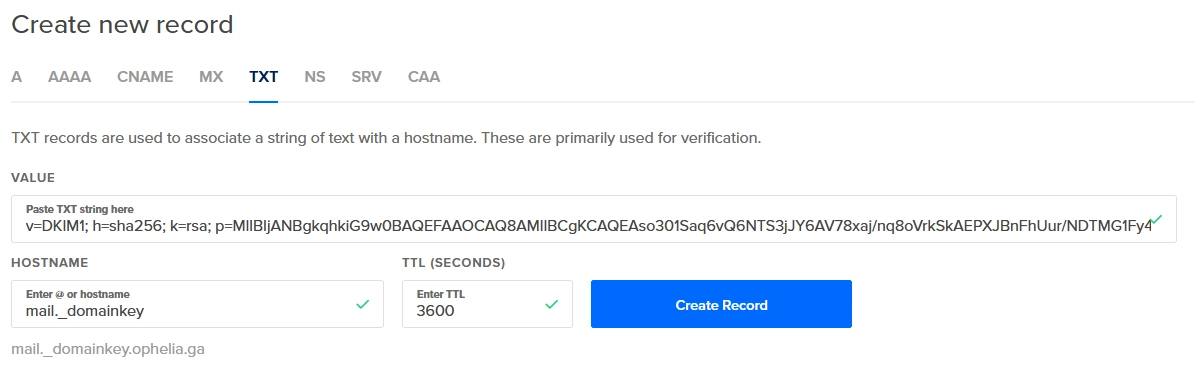
And finally, you can see the DKIM key:
sudo cat mail.txt
This file should look like this:
mail._domainkey IN      TXT     ( "v=DKIM1; h=sha256; k=rsa; "
          "p=MIIBIjANBgkqhkiG9w0BAQEFAAOCAQ8AMIIBCgKCAQEAso301Saq6vQ6NTS3jJY6AV78xaj/nq8oVrkSkAEPXJBnFhUur/NDTMG1Fy4L+3QnJx6i9nyp/GnztACA/Iun34sMaqAvPZ1HxtjZYCj6V1qnpx1rXu0Q6EqsWfEP+RvrYHnoy51r46p1MH0zbi3ewrVShEqSlOuwFFljG4pDqFltUzA0ryt89Q6xT0WzhjAs1PRl/GwrsPWKi8"
          "9w08C7EDnOT9iH3PudhZtdXvJAxlm8TwnM9D5lW2GfGv4fAJKzwel5NLlhE/xlugT64bIe0fopAlCSN0BpcNQI49NZa4upshaoiiKqRlYfWZZuYoLLq5XWm/70EvQdawizl2rAEwIDAQAB" )  ; ----- DKIM key mail for ophelia.ga
The value inside the parentheses is what you need. Select and copy the entire region from and do not include the double-quote before v=DKIM1. Also, do not include the final double-quote before the closing parentheses.
Paste that as the value for the TXT record in your DNS server. I will use my hosting provider, DigitalOcean, to do it.
Restart the services to add the DKIM key
sudo service postfix restart
sudo service opendkim restart
Check configuration of DKIM
We can check the DKIM key is installed fine with the tool opendkim-testkey.
root|ophelia:~$ opendkim-testkey -d ophelia.ga -s mail -vvv
opendkim-testkey: using default configfile /etc/opendkim.conf
opendkim-testkey: checking key 'mail._domainkey.ophelia.ga'
opendkim-testkey: key not secure
opendkim-testkey: key OK
root|ophelia:~$
Also, we could check from any Linux server the DNS resolution of this new TXT record.
root|lavrea:~$ dig +noall +answer +multiline mail._domainkey.ophelia.ga TXT
mail._domainkey.ophelia.ga. 3600 IN TXT "v=DKIM1; h=sha256; k=rsa; p=MIIBIjANBgkqhkiG9w0BAQEFAAOCAQ8AMIIBCgKCAQEAso301Saq6vQ6NTS3jJY6AV78xaj/nq8oVrkSkAEPXJBnFhUur/NDTMG1Fy4L+3QnJx6i9nyp/GnztACA/Iun34sMaqAvPZ1HxtjZYCj6V1qnpx1rXu0Q6EqsWfEP+RvrYHnoy51r46p1MH0zbi3ewrVShEqSlOuwFFljG4pDqFltUzA0ryt89Q6" "xT0WzhjAs1PRl/GwrsPWKi89w08C7EDnOT9iH3PudhZtdXvJAxlm8TwnM9D5lW2GfGv4fAJKzwel5NLlhE/xlugT64bIe0fopAlCSN0BpcNQI49NZa4upshaoiiKqRlYfWZZuYoLLq5XWm/70EvQdawizl2rAEwIDAQAB"
The last way to verify the DKIM configuration is right, is using the service verifier.port25.com. It is needed just to send an e-mail from your mail server to check-auth@verifier.port25.com, and the service will analyze your message and mails you a report indicating whether your e-mail was signed correctly or not.
root|ophelia:~$ mail -a "From: root <root@ophelia.ga>" -s "Test" "check-auth@verifier.port25.com"
Cc:
test

root|ophelia:~$
(Remember, Control+D to finish)
And check the mail inbox in which you will receive the report.
DMARC (Domain Message Authentication, Reporting and Conformance)
DMARC (Domain Message Authentication, Reporting & Conformance) allows you to advertise to mail servers the policies of your domain. The policies are regarding mails that fail SPF or DKIM validations. It also allows you to request reports on failed messages from receiving mail servers.
This configuration is optional, but I believe it’s good to configure it. The DMARC record is added to advise mail servers what to do with emails claiming to be from your domain that fail SPF or DKIM validations.
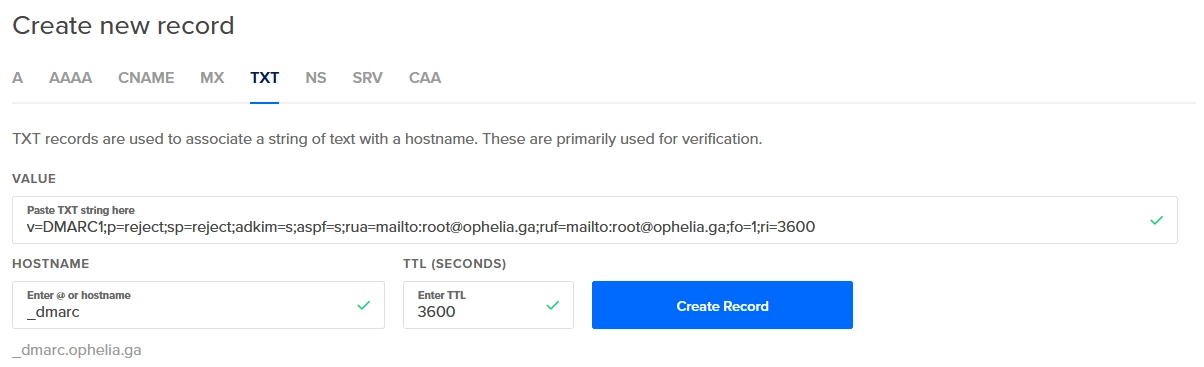
The DMARC record is also a TXT record (as SPF and DKIM), for the host _dmarc in your domain with the following values:
"v=DMARC1;p=quarantine;sp=quarantine;adkim=s;aspf=s;rua=mailto:root@ophelia.ga;ruf=mailto:root@ophelia.ga;fo=1;ri=3600"
The parameters I used are described here:
v=DMARC1is a mandatory tag.p=quarantine, this indicates the policy to apply to the email which fails the DMARC check. In my case, I use ‘quarantine’ (do not discard, but treat different from regular mails). This policy can be set to ’none’, ‘quarantine’, or ‘reject’. ’none’ is used to collect the DMARC report and gain insight into the current email flows and their status.sp=quarantinespecify to quarantine the emails from subdomains of the domain that fail the DMARC check.adkim=sspecifies the ‘alignment mode’ for DKIM signatures. This can be eitherr(relaxed) ors(strict).aspf=sspecifies the ‘alignment mode’ for SPF signatures. This can be eitherr(relaxed) ors(strict).rua=mailto:root@ophelia.gaspecifies the email address to send the reports.ruf=mailto:root@ophelia.gaspecifies the email address to send the forensic reports.fo=1specify forensic options. Allowed values: ‘0’ to generate reports if both DKIM and SPF fail, ‘1’ to generate reports if either DKIM or SPF fails to produce a DMARC pass result, ’d’ to generate report if DKIM has failed or ’s’ if SPF failed.ri=3600specifies the reporting interval for how often you’d like to receive aggregate XML reports. This is a preference, and ISPs could (and most likely will) send the report on different intervals (normally this will be daily).
Write the value for the TXT record in your DNS server, as before, I will use my hosting provider, DigitalOcean, to do it.
Check configuration of DMARC
The DMARC configuration could be checked by dig:
root|lavrea:d$ dig TXT _dmarc.ophelia.ga +noall +answer;
_dmarc.ophelia.ga.      3600    IN      TXT     "v=DMARC1;p=quarantine;sp=quarantine;adkim=s;aspf=s;rua=mailto:root@ophelia.ga;ruf=mailto:root@ophelia.ga;fo=1;ri=3600"
root|lavrea:d$
Also, you could use the dmarcian DMARC Record Checker to validate your DMARC records.
Testing mail service with mail tool again
Remote delivery
As we saw before, our mail was bounced. Now, with the configuration we have done, I believe will be enough to have our mail server working.
We will use our gabriel user to send another email to the GMail server.
root|ophelia:~$ su - gabriel
gabriel@ophelia:~$ mail mytestaccount@gmail.com
Cc:
Subject: Test 2
Test 2
(Control+D to finish)
And now we can check the log /var/log/mail.log to check the answer of the GMail server.
You could have a clue of what’s happening in the log /var/log/mail.log:
Jul 27 17:19:53 ophelia postfix/pickup[19402]: E0D643F19D: uid=1000 from=<gabriel@ophelia.ga>
Jul 27 17:19:53 ophelia postfix/cleanup[21492]: E0D643F19D: message-id=<20220727151953.E0D643F19D@ophelia.ga>
Jul 27 17:19:53 ophelia opendkim[14911]: E0D643F19D: DKIM-Signature field added (s=mail, d=ophelia.ga)
Jul 27 17:19:53 ophelia postfix/qmgr[14842]: E0D643F19D: from=<gabriel@ophelia.ga>, size=351, nrcpt=1 (queue active)
Jul 27 17:19:55 ophelia postfix/smtp[21494]: E0D643F19D: to=<mytestaccount@gmail.com>, relay=gmail-smtp-in.l.google.com[172.253.115.26]:25, delay=1.8, delays=0.09/0.03/0.47/1.2, dsn=2.0.0, status=sent (250 2.0.0 OK  1658935195 bb13-20020a05622a1b0d00b0031ee2b1e392si10322968qtb.510 - gsmtp)
Jul 27 17:19:55 ophelia postfix/qmgr[14842]: E0D643F19D: removed
And yeah!!!, the status of the mail is “sent”, so the GMail server accepted our mail. Good news. Now we have a mail server running successfully with local and remote delivery.

Hey! 👋 Thank you for visiting this page. If you enjoy my work, consider supporting with a Coffee, it really makes a difference :)